
Deploy the Cloudflare PS Bootcamp Application Security lab environment
This page is the gateway for the Cloudflare PS Bootcamp Application Security course labs.
This will provision three Ubuntu virtual machines and the AcmeCorp web stack in your own AWS account, in about 10 minutes. The labs themselves run in your Cloudflare dashboard account, which must carry the Application Security entitlements (Bot Management, API Shield, Advanced Certificate Manager, Load Balancing, and Advanced Rate Limiting). As a Cloudflare partner, you grant those to yourself through the Not For Resale (NFR) program.
Read the requirements below before you run it.
Is this automated installer right for you?
This installer only works on a fresh, empty AWS sandbox account. If you want to deploy the lab into a pre-existing AWS account that already has your own work in it, the installer's preflight will hard-block the deploy with no override. That's deliberate. It prevents the lab from conflicting with or damaging your existing infrastructure.
If you'd rather use your own pre-existing AWS account (or your own VMs, or your own non-AWS environment), stop here and follow the manual setup guide instead. It walks you through the same lab environment, but you build it yourself in whatever cloud or virtualization platform you choose.
Required: these conditions must be satisfied before attending class.
Each row below is required. The AWS account row is enforced by software. The bootstrap's preflight refuses to deploy without it. The two Cloudflare rows are not enforced, but the labs themselves fail in class if either is missing. Line all three up before you start the installer.
| Requirement | Why & how to get it |
|---|---|
| A Cloudflare Enterprise account with the Application Security add-ons | The labs use Bot Management, API Shield, Advanced Certificate Manager, Load Balancing, and Advanced Rate Limiting, plus the WAF that ships with every Enterprise zone. Request them from your Cloudflare account team or partner manager. Lead time can be weeks, so start early. |
| A registered public domain added to that Cloudflare account as an Enterprise zone |
The labs proxy the AcmeCorp site and public-api through Cloudflare
on hostnames like www.yourdomain.com and
api.yourdomain.com. Any registrar works; the domain
just needs to be real, publicly resolvable, and have its
nameservers pointing to Cloudflare on the Enterprise plan.
|
| A fresh, empty AWS account |
The Terraform deploys three VPCs and three EC2 instances into
your AWS account. The bootstrap's preflight
hard-blocks the deploy with no override if the
account has any of: existing resources (EC2, S3, IAM users,
custom IAM roles, RDS, Lambda, load balancers, non-default VPCs);
AWS Organizations membership; Transit Gateways, VPC peering,
Direct Connect, or VPNs; or a production-sounding account alias
(prod, corp, main,
shared, enterprise, live).
|
1. Sign in to your Cloudflare account and verify everything works
The installer doesn't need Cloudflare access. It only talks to AWS. But the labs themselves all happen in the Cloudflare dashboard against a proxied zone. If your Cloudflare account is missing an Application Security add-on or pointed at the wrong subscription, you'll discover it at 9 AM on Day 1 and lose hours. Run through the checklist below before the installer to confirm everything is ready.
- Open a new browser tab to dash.cloudflare.com and sign in with the Cloudflare account that has your Enterprise + Application Security add-ons (the one you set up per the requirements at the top of this page).
- If your login can access more than one Cloudflare account, you'll
land on the Accounts page listing each one and can
select the correct one.
- You'll usually only see this on a first sign-in or in Incognito. Otherwise, the dashboard drops you back where you last were, so use the account name in the left sidebar to switch.
- Double-check the account ID in the URL or in the account profile. If your login has prod and lab accounts, this is the most common student mistake.
From Account → Domains → Overview, click your lab domain to open the per-domain dashboard. Then click through each of the following pages in the domain's left sidebar and confirm they load without an "Upgrade" or "Get started with..." upsell screen. (These paths were browser-verified on the redesigned dashboard, where WAF, rate limiting, API Shield, and Bot Management all live under Security.)
| Where to click | What should happen |
|---|---|
| Security → Security rules | Page loads with the Security rules and DDoS protection tabs, and rule categories including Custom rules, Advanced rate limiting rules, Managed rules (WAF), and API JWT validation rules. Not an upsell page. |
| Security → Web assets | API Shield surface loads with the Operations, Sequences, Schema validation, and Client-side resources tabs. |
| Security → Settings | Detection settings render, including the Bot traffic category with Bot management controls (plus Web application exploits, API abuse, Client side abuse). |
| Traffic → Load Balancing | Load Balancing page loads (empty is fine; you build the load balancer in the Lab 5 exercise). Health Checks also appears under Traffic. |
| SSL/TLS → Edge Certificates | Edge Certificates page loads (Advanced Certificate Manager lives here). Not an upsell page. |
Domains → Overview
Click "Back to Domains" at the top of the domain's left sidebar to get back out to the domains list.
If you have already registered a public domain you want to use for this class, it appears as a row in the table. If you have not created and registered a domain yet in the Cloudflare dashboard, this would be the time to do that. Some domains are as low as ~$5/year.
- Status column shows Active
- Plan column shows Enterprise
- If Status is "Pending" or Plan is anything other than Enterprise, the zone isn't ready for the labs
If any of those rows shows an upsell page or fails to load, stop here and contact your Cloudflare account team. An incomplete entitlement set is much easier to fix a week before class than during it.
2. Access AWS
2a. Create a new AWS Account
Skip this step if you already have an AWS account you want to use (it must be blank and not part of an AWS organization), and move on to step 2b.
If you don't have an AWS account yet, create one first. It takes about 10 minutes:
A credit card is required for signup, but new accounts get $100 in AWS Free Tier credits and 6 months of free access, enough for a multi-day lab. If you don't convert to a paid plan when the 6 months are up, AWS closes the account, so there's no risk of forgotten charges piling up.
- Open aws.amazon.com/account.
- Click Create an AWS Account.
- Enter an email address. A new free Gmail account can help keep this sandbox separate from any other AWS accounts you might have.
- When prompted for an AWS account name, enter cloudflare-lab. (AWS requires a name here. You can use this name, but it's only a suggestion.)
- Go through the rest of the signup.
- Choose the Basic Support - Free plan.
- When signup completes, sign in to console.aws.amazon.com as the root user.
- Skip Step 2b.
Brand-new AWS accounts can take up to 24 hours to fully activate, though most are usable in under 10 minutes. If preflight later complains about permissions or an API call fails inexplicably, give the account 30 minutes to finish provisioning and try again.
2b. If you already have an AWS account you want to use
- Open console.aws.amazon.com in your browser.
- Sign in as the root user of that account, using the email address and password you set when you created it.
- Double-check the account ID shown in the top-right of the AWS Console (12 digits). If you have multiple AWS accounts, make absolutely sure this is the empty sandbox one. Deploying into the wrong account is the most common student mistake.
- Check your account name / alias. Click your
account name in the top-right. If it says anything that contains
prod,corp,main,shared,enterprise, orlive, the installer's preflight check will refuse to deploy (it's a hard-block, by design, so you can't accidentally deploy lab VMs into production). Set the account alias to something like cloudflare-lab via IAM → Dashboard → Account Alias → Create before continuing.
3. Create an access key for the root user
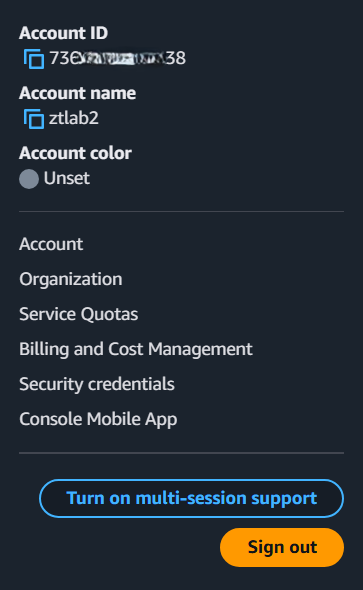
- Click your account name in the top-right corner of the console.
- Copy your account number to your clipboard. In just a moment you will paste it into a CSV file alongside your access key.
- Click on Security credentials.
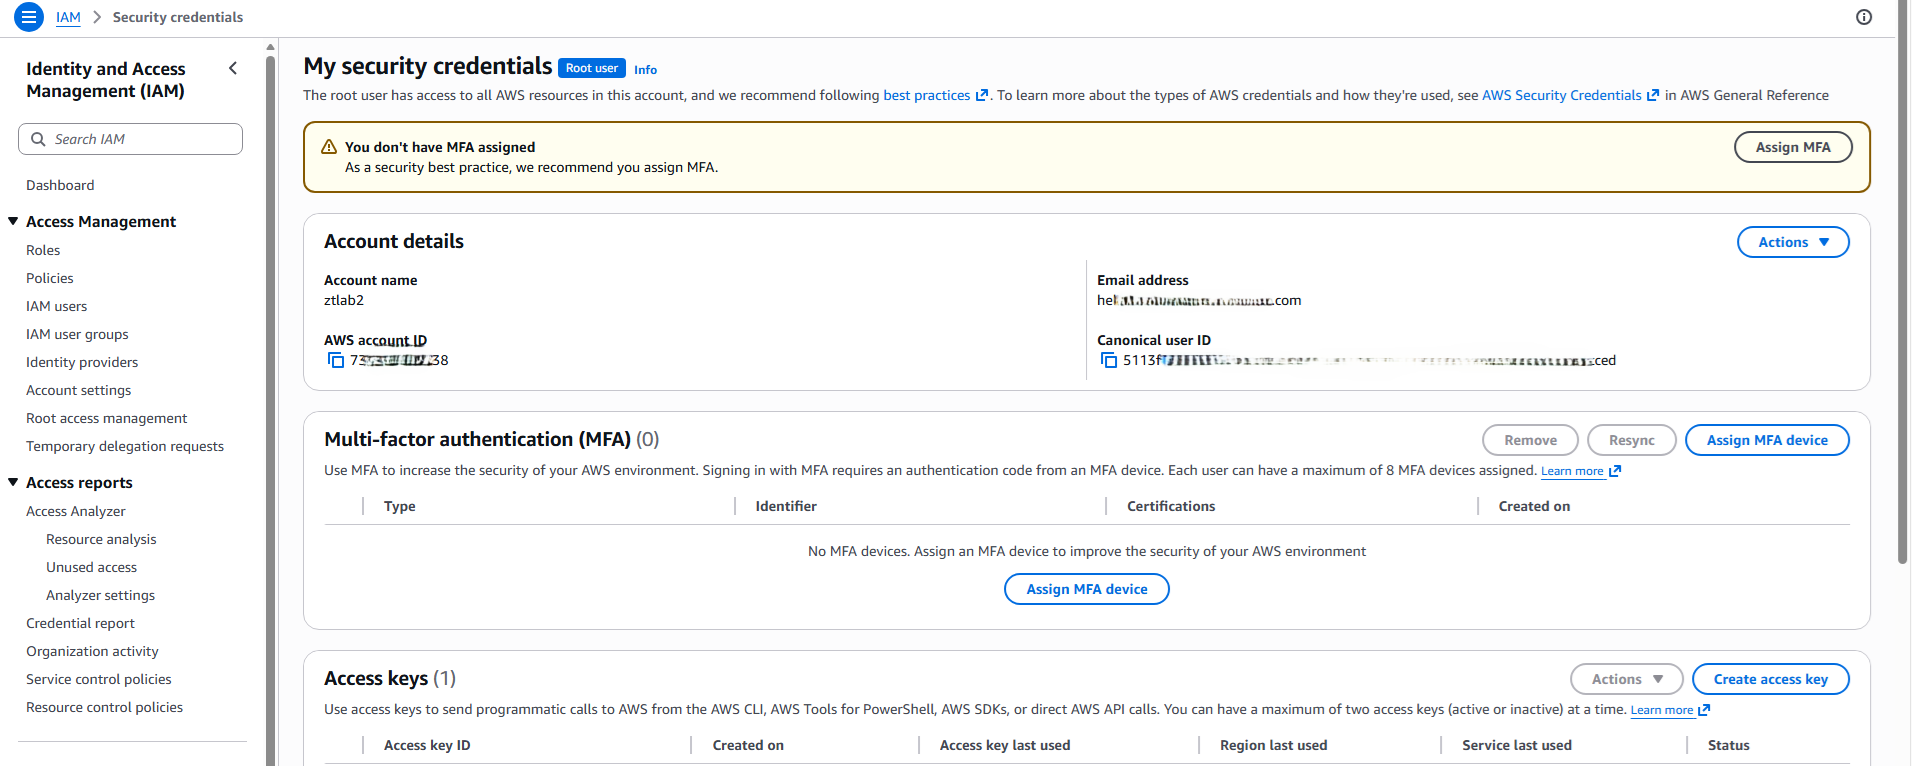
- Scroll to the Access keys section and click
Create access key.
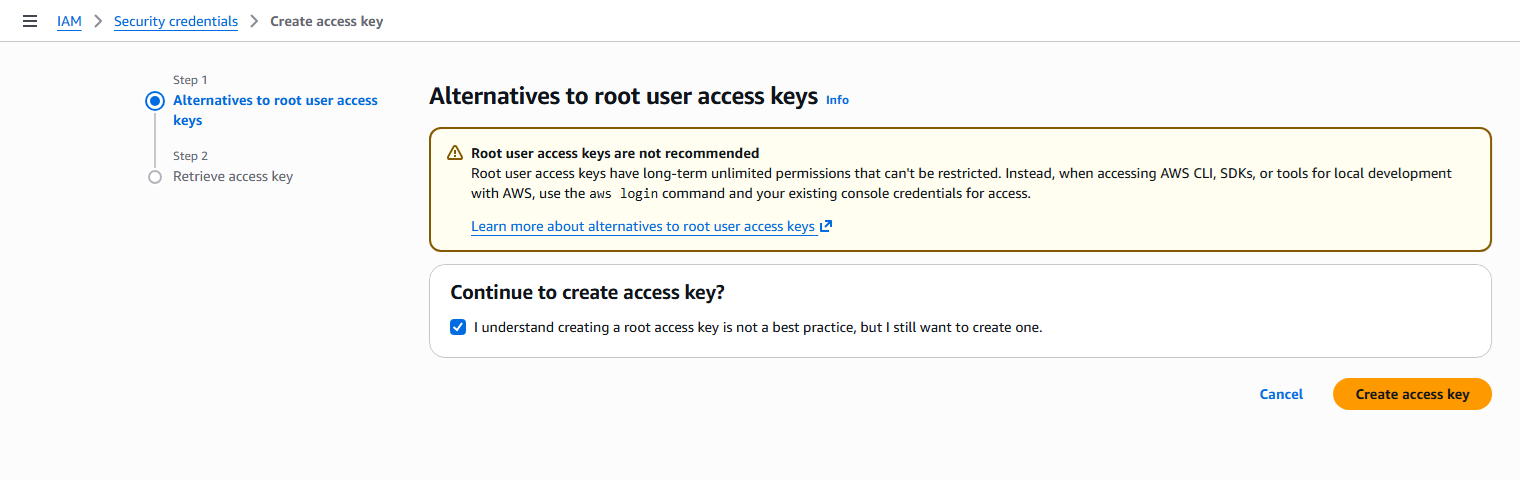
- AWS opens a two-step wizard. The first step is called
"Alternatives to root user access keys" and tries to talk
you out of creating one.
- For a 4-day lab environment this should be fine, so just check the "I understand" confirmation box and click Create access key.
- If you would rather go through the process of creating an IAM user to limit credentials, feel free to do that at this time, but there is no walkthrough in this guide for that process.
- The second step is called "Retrieve access key".
Click the "Download .CSV file" button in the bottom-right corner.
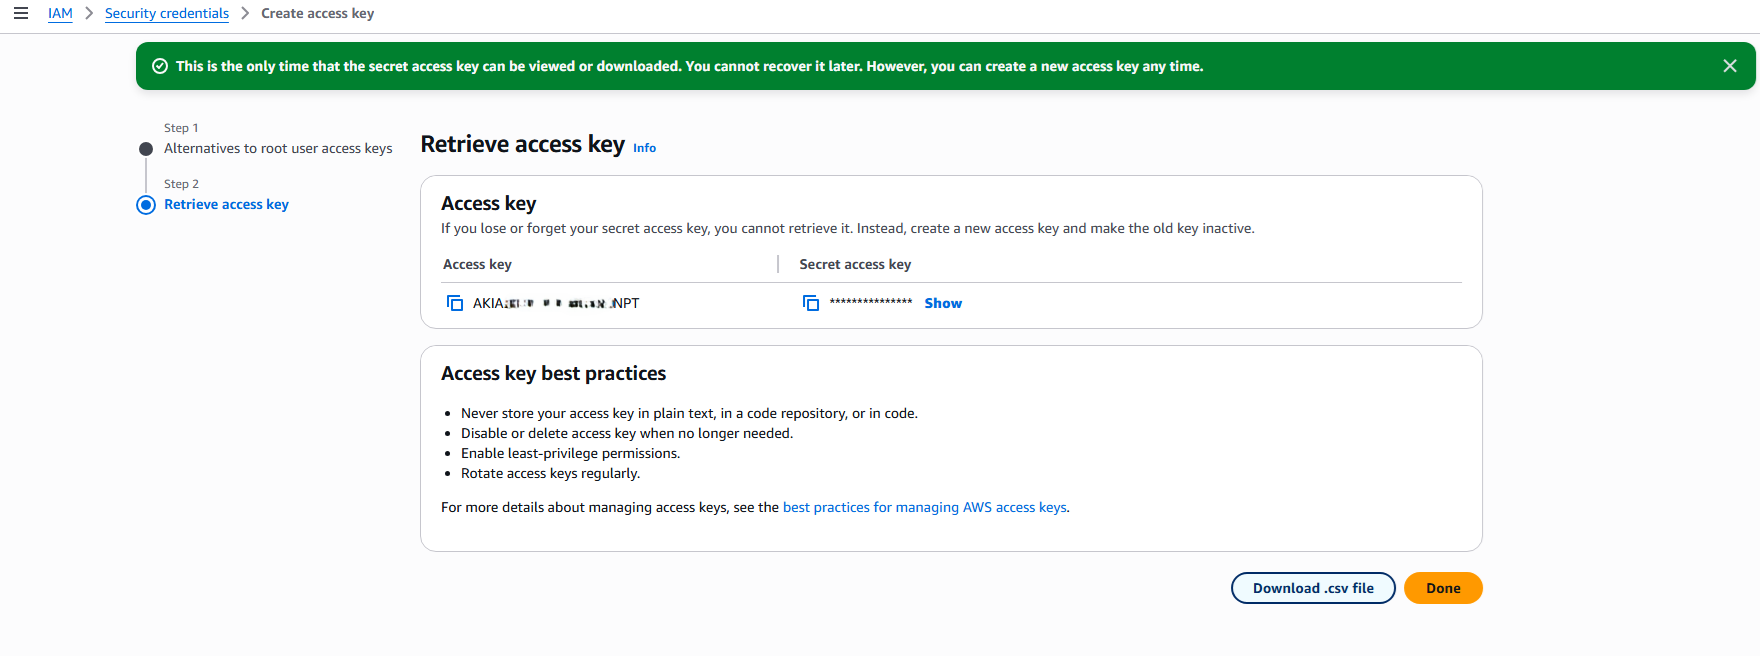
After it downloads, open the file in a text editor. It will look something like the image below:
- The first value (before the comma) is the Access key ID; the value after the comma is the Secret access key. You'll need both of these values in a few moments.
- Click Done.
- Paste the account number from your clipboard into this text file for use in just a moment.
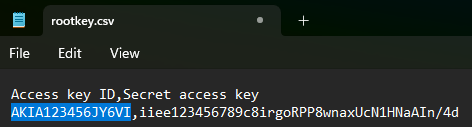
The secret access key cannot be retrieved a second time. If you lose it, delete this key in IAM and create a new one.
The rest of this page is available in two versions. Pick the one that matches how you like to work.
4. Run the installer
Pick your operating system in the tab strip below.
Tested on Windows 11 and Windows Server 2022 with PowerShell 5.1+.
- Open PowerShell as Administrator.
- Run the installer:
irm https://appsec-lab-deploy.cloudflareacademy.com/win | iex - Type yes at the disclosure.
- If you already have a Python 3 version other than 3.13.x installed, the installer warns you and asks Install pinned 3.13 / Continue with existing.
- I is the preferred choice.
- Answer the prompts:
- AWS Access Key ID
- Secret Access Key
- Region (default us-east-1).
- Press Enter to accept it unless you want to change the region.
- Instance types
- Just hit Enter to accept the defaults.
- At the lab menu, choose [1] Deploy new lab.
- Wait ~10-20 minutes for preflight + deploy + smoke test.
Troubleshooting Deployment
| What you see | Fix |
|---|---|
irm : The term 'irm' is not recognized | You're in Command Prompt, not PowerShell. Open PowerShell as Administrator instead. |
The term 'winget' is not recognized | winget isn't installed. Run this in your elevated PowerShell to install it, then re-run the installer:
if (Get-Command winget -ErrorAction SilentlyContinue) { Write-Host 'winget is already installed. No action needed.' -ForegroundColor Green } else { [Net.ServicePointManager]::SecurityProtocol = [Net.SecurityProtocolType]::Tls12; $tmp = "$env:TEMP\winget-setup"; New-Item -ItemType Directory -Force -Path $tmp | Out-Null; Invoke-WebRequest -Uri https://aka.ms/Microsoft.VCLibs.x64.14.00.Desktop.appx -OutFile "$tmp\VCLibs.appx"; Invoke-WebRequest -Uri https://aka.ms/getwinget -OutFile "$tmp\winget.msixbundle"; Add-AppxPackage -Path "$tmp\VCLibs.appx"; Add-AppxPackage -Path "$tmp\winget.msixbundle"; Write-Host 'winget installed. Close and reopen PowerShell, then re-run the installer.' -ForegroundColor Green }
|
python not recognized after install | Close PowerShell, open a new elevated window, and re-run the installer. |
The SSL connection could not be established | Old PowerShell defaulting to weak encryption. Paste this in the same window, press Enter, then re-run the installer:
[Net.ServicePointManager]::SecurityProtocol = [Net.SecurityProtocolType]::Tls12
|
| Accidentally closed PowerShell mid-install | Reopen elevated PowerShell and re-run the installer. Already-installed tools are skipped. |
Tested on macOS 13+ (Ventura and later) on both Apple Silicon (M1/M2/M3/M4) and Intel.
- Open Terminal.
- If you don't have Homebrew, install it first, then close and reopen Terminal before continuing:
/bin/bash -c "$(curl -fsSL https://raw.githubusercontent.com/Homebrew/install/HEAD/install.sh)" - Run the installer:
curl -fsSL https://appsec-lab-deploy.cloudflareacademy.com/mac | bash - Type yes at the disclosure.
- If you already have a Python 3 version other than 3.13.x installed, the installer warns you and asks Install pinned 3.13 / Continue with existing.
- I is the preferred choice.
- Answer the prompts:
- AWS Access Key ID
- Secret Access Key
- Region (default us-east-1).
- Press Enter to accept it unless you want to change the region.
- Instance types
- Just hit Enter to accept the defaults.
- At the lab menu, choose [1] Deploy new lab.
- Wait ~10-20 minutes for preflight + deploy + smoke test.
Troubleshooting Deployment
| What you see | Fix |
|---|---|
command not found: brew immediately after installing Homebrew | Close and reopen Terminal. Homebrew adds itself to PATH only for new shells. Then re-run the install command. |
xcrun: error: invalid active developer path | Paste xcode-select --install, click Install on the pop-up, wait, then re-run. |
| Pop-up asking for your password | Normal. Type your Mac login password (characters hidden) and press Enter. |
| Accidentally closed Terminal mid-install | Reopen Terminal, re-run the install command. Already-installed tools are skipped. |
Ubuntu 22.04 / 24.04 / Debian 12+ tested. Other Linux/glibc distros likely work. The installer fetches a prebuilt CPython 3.13.14 from python-build-standalone, so distro Python version doesn't matter.
- Open a terminal.
- Run the installer (automatically checks for curl and prompts to install if needed):
command -v curl >/dev/null 2>&1 || { echo "curl is required. Install it now? (y/n)"; read -r answer; [[ "$answer" == "y" ]] && sudo apt update && sudo apt install -y curl || exit 1; }; curl -fsSL https://appsec-lab-deploy.cloudflareacademy.com/linux | bash - If prompted about curl, type y and press Enter, then enter your sudo password.
- Type yes at the disclosure.
- If you already have a Python 3 version other than 3.13.x installed, the installer warns you and asks Install pinned 3.13 / Continue with existing.
- I is the preferred choice.
- Answer the prompts:
- AWS Access Key ID
- Secret Access Key
- Region (default us-east-1).
- Press Enter to accept it unless you want to change the region.
- Instance types
- Just hit Enter to accept the defaults.
- At the lab menu, choose [1] Deploy new lab.
- Wait ~10-20 minutes for preflight + deploy + smoke test.
Troubleshooting Deployment
| What you see | Fix |
|---|---|
command not found: curl | Paste sudo apt-get update && sudo apt-get install -y curl then re-run. |
apt-get not available on this Linux | Not Debian/Ubuntu. Install Python 3 with your distro's package manager, then re-run. |
user is not in the sudoers file | Ask an admin to add you to the sudo group, then re-run. |
| Accidentally closed the terminal mid-install | Reopen terminal, re-run. Already-installed tools are skipped. |
Your lab environment is deployed. The remaining sections are verification (Post Deployment Testing) and an optional permanent-copy walkthrough.
Here's what just happened
What the script did
- Installed CPython 3.13.14 (the pinned, lab-tested version) via the official python.org installer.
- Installed CPython 3.13.14 (the pinned, lab-tested version) via
brew install python@3.13. - Installed CPython 3.13.14 (the pinned, lab-tested version) from a prebuilt python-build-standalone tarball.
- Downloaded the lab source tarball from this site.
- Installed AWS CLI v2.
- Prompted for AWS Access Key ID, Secret Access Key (masked with asterisks), and region (default us-east-1). Wrote them straight to
~/.aws/credentialsand~/.aws/config. - Ran the AWS preflight check, which hard-blocks if the account isn't empty.
- Installed Terraform (only after preflight passes).
- Ran
terraform apply(4-6 min) to create 3 VPCs and 3 EC2 instances. Everything Terraform creates is tracked in state; nothing is provisioned outside it. - Smoke-tested both origins (AcmeCorp website on :80, nginx
/status, the Node public-api on :443 viacurl -k, and the Basic-auth/admin401 on each). Origin A should advertise"origin":"primary"and Origin B"origin":"backup". - Printed a post-class reminder: run
python setup.py destroy, then delete your root access key from the IAM Console.
What landed in your AWS account
- 3 VPCs (
10.90.0.0/16workstation,10.91.0.0/16Origin A primary,10.92.0.0/16Origin B backup), with no peering between any of them. - 3 internet gateways, 3 subnets, 3 route tables
- 3 security groups (SSH locked to your public IP; HTTP 80 and HTTPS 443 on both origins open to the world so Cloudflare's edge can reach them)
- 1 EC2 key pair (shared by all three VMs, used by
setup.pyfor emergency SSH access if password authentication fails) - 3 EC2 instances:
appsec-workstation: your Ubuntu workstation (Ubuntu 24.04 at10.90.0.90), preloaded with curl, dig, openssl, jq, python3, node, docker, git, and nmap. You drive the labs from here.appsec-origin-a: the primary combined origin (Ubuntu 24.04 at10.91.0.91): nginx on :80 plus the Node public-api on :443.appsec-origin-b: the backup combined origin (Ubuntu 24.04 at10.92.0.92). The second Load Balancer pool member for the Lab 5 exercise.
New AWS accounts get $100 in AWS Free Tier credits and 6 months of
free access, enough for a multi-day lab. Tear it all down
with python setup.py destroy when class ends. If you don't
convert to a paid plan when the 6 months are up, AWS closes the account.
5. Post Deployment Testing
Plug in your lab values
Type your AWS region first. The Console link further down on this page will auto-fill with it, so you can click into the AWS Console and find your VM IPs without typing anything. Saved in your browser (survives reloads).
Where to find your region: in the terminal window where
you ran the install command, scroll up. Near the end of the output you'll
see a line like aws_region = "us-east-1". Type that value
(without quotes) into the box above.
The fastest way to find your VMs in the AWS Console: click the Copy button on the link below, paste it into your browser's address bar, and press Enter. The link was built from the AWS region you typed in above, so it drops you straight onto the EC2 Instances page in the correct region (no menu clicking). Sign in if AWS prompts you.
https://<region>.console.aws.amazon.com/ec2/home?region=<region>#Instances:
Once the page loads, you'll see three instance rows:
appsec-workstation: your Ubuntu workstation (you drive the labs from here).appsec-origin-a: the primary combined origin (nginx :80 + Node public-api :443).appsec-origin-b: the backup combined origin. The second Load Balancer pool member for the Lab 5 exercise.
The Public IPv4 address column on each row is the value you'll paste below.
Don't want to use the link? Sign in to console.aws.amazon.com manually, use the region selector in the top-right to pick your region, then click EC2 → Instances.
Paste each VM's Public IPv4 address from the AWS Console below.
These need to work before day 1 of the class.
- Once you have all three public IPs, run these nine checks.
- If any fails, see the Troubleshooting box below.
SSH tests
1. SSH into Origin A (primary origin)
From a PowerShell window on your laptop:
From Terminal on your laptop:
From any terminal on your laptop:
ssh cloudflare@<ubuntu-ip>
At the password prompt enter #Savetheinternet. You should land at a cloudflare@origin-primary:~$ shell prompt. Type exit to disconnect.
2. SSH into Origin B (backup origin)
From a PowerShell window on your laptop:
From Terminal on your laptop:
From any terminal on your laptop:
ssh cloudflare@<ubuntu-b-ip>
Same password #Savetheinternet as Origin A. You should land at a cloudflare@origin-backup:~$ shell prompt. Type exit to disconnect.
3. SSH into the workstation
From a PowerShell window on your laptop:
From Terminal on your laptop:
From any terminal on your laptop:
ssh cloudflare@<workstation-ip>
Same password #Savetheinternet. You should land at a cloudflare@workstation:~$ shell prompt. This is the box you drive every lab from; it has curl, dig, openssl, jq, python3, node, docker, git, and nmap preloaded. Type exit to disconnect.
HTTP tests
4. AcmeCorp website on Origin A (port 80)
Open in your browser:
http://<ubuntu-ip>
Renders the AcmeCorp homepage.
5. Public-api on Origin A (port 443, self-signed TLS)
Same VM, the Node public-api on :443. Run from any terminal (-k accepts the self-signed cert):
curl -k https://<ubuntu-ip>/status
Returns the public-api health JSON, with an X-Origin: origin-1 response header.
6. Origin A /status identifies as primary
Open in your browser, or run from any terminal:
http://<ubuntu-ip>/status
Returns {"status":"healthy","origin":"primary"}.
7. AcmeCorp website on Origin B (port 80)
Open in your browser:
http://<ubuntu-b-ip>
Renders the same AcmeCorp homepage as Origin A: identical content, served from Origin B's nginx.
8. Public-api on Origin B (port 443, self-signed TLS)
Same VM, the Node public-api on :443. Run from any terminal:
curl -k https://<ubuntu-b-ip>/status
Returns the same public-api health JSON as Origin A, but with an X-Origin: origin-2 response header.
9. Origin B /status identifies as backup
Open in your browser, or run from any terminal:
http://<ubuntu-b-ip>/status
Returns {"status":"healthy","origin":"backup"}. This "origin" field is what makes the two pool members tell themselves apart at the curl level in the Application Security Lab 5 Load Balancer exercise.
Troubleshooting Tests
Click to expand
| What you see | Why | Fix |
|---|---|---|
| HTTP test: page doesn't load or times out | The Ubuntu VM is still running cloud-init (nginx not started yet), OR your public IP has changed since deploy | Wait 2-3 more minutes after the installer finished. If still failing, run:
python setup.py update-ip
|
ssh: connect to host <ip> port 22: Connection timed out |
Security group doesn't allow your current public IP (it changed since you deployed) | Run this from any computer with the same AWS key (it pulls your lab state from S3 first), then retry SSH:
python setup.py update-ip
|
Connection refused on SSH |
sshd hadn't finished restarting after cloud-init wrote the password-auth config | Wait 30 sec and retry. If still failing, see the break-glass section below. |
Permission denied or password rejected |
The cloudflare user wasn't created yet, OR sshd didn't pick up the password-auth config |
Break-glass via the ubuntu user (below), then run:
sudo systemctl restart ssh
|
PowerShell says 'ssh' is not recognized |
Older Windows without OpenSSH client | From elevated PowerShell, run this, then retry:
Add-WindowsCapability -Online -Name OpenSSH.Client~~~~0.0.1.0
|
Break-glass: SSH as the ubuntu user via your SSH key. The cloudflare user uses password auth; the ubuntu user has its own key-based path that works even if the password-auth setup is broken. The key is ~/.ssh/id_ed25519, either your existing key (if you already had one) or a fresh one that setup.py generated during install and registered with AWS. The same key authorizes all three VMs (workstation, Origin A, Origin B).
Origin A (primary):
ssh -i $env:USERPROFILE\.ssh\id_ed25519 ubuntu@<ubuntu-ip>
ssh -i ~/.ssh/id_ed25519 ubuntu@<ubuntu-ip>
ssh -i ~/.ssh/id_ed25519 ubuntu@<ubuntu-ip>
Origin B (backup):
ssh -i $env:USERPROFILE\.ssh\id_ed25519 ubuntu@<ubuntu-b-ip>
ssh -i ~/.ssh/id_ed25519 ubuntu@<ubuntu-b-ip>
ssh -i ~/.ssh/id_ed25519 ubuntu@<ubuntu-b-ip>
Once in (either VM), run this to confirm cloud-init finished:
sudo cloud-init status
Then, if password auth still isn't working, restart sshd:
sudo systemctl restart ssh
Managing your lab: run the same command again
The launcher is your single control panel. Run the same one-liner you used to deploy and it detects that a lab already exists for your AWS account, then shows a short menu:
irm https://appsec-lab-deploy.cloudflareacademy.com/win | iex
curl -fsSL https://appsec-lab-deploy.cloudflareacademy.com/mac | bash
command -v curl >/dev/null 2>&1 || { echo "curl is required. Install it now? (y/n)"; read -r answer; [[ "$answer" == "y" ]] && sudo apt update && sudo apt install -y curl || exit 1; }; curl -fsSL https://appsec-lab-deploy.cloudflareacademy.com/linux | bash
What would you like to do?
  [1] Update my IP  (unlock SSH from where I am now)
  [2] Destroy lab   (tear everything down, remove the state bucket)
  [3] Quit
This works from any computer with the same AWS key, including
one that never ran the deploy. Your whole lab directory is mirrored to a
private, encrypted S3 bucket (appsec-lab-state-<account_id>)
in your own AWS account; the launcher pulls it down first, so a fresh computer
installs the toolchain, asks for your AWS key once (the account id is detected
automatically), and drops you straight into the same menu. You never type a
file path. Choosing Destroy also removes that bucket, so
nothing is left behind.
Power-user commands (optional)
If you prefer, you can drive the same actions directly from the installed
setup.py (full path, so it works in any shell in
any directory; no need to cd into the lab folder).
These are exactly what the menu runs under the hood.
Paste into PowerShell.
Paste into Terminal.
Paste into any shell.
Reprint the VM IPs, SSH commands, and every Terraform output:
python "$env:USERPROFILE\cloudflare-appsec-lab\setup.py" show
python3 ~/cloudflare-appsec-lab/setup.py show
python3 ~/cloudflare-appsec-lab/setup.py show
Refresh security groups when your public IP changes:
python "$env:USERPROFILE\cloudflare-appsec-lab\setup.py" update-ip
python3 ~/cloudflare-appsec-lab/setup.py update-ip
python3 ~/cloudflare-appsec-lab/setup.py update-ip
Tear down everything (run this when class ends):
python "$env:USERPROFILE\cloudflare-appsec-lab\setup.py" destroy
python3 ~/cloudflare-appsec-lab/setup.py destroy
python3 ~/cloudflare-appsec-lab/setup.py destroy
6. Walking away with a permanent copy (optional)
cd ~/cloudflare-appsec-lab
git init && git add . && git commit -m "My CF PS Bootcamp lab"
git remote add origin <your-git-host-URL>
git push -u origin main
Any git host works: GitHub, GitLab, Gitee, BitBucket, AWS CodeCommit, self-hosted Gitea.
Set aside about 20 minutes of uninterrupted time. The installer downloads software, asks you a few questions, then builds the lab in AWS. You can't leave it unattended. It pauses for your input at several steps.
4. Run the installer
Pick your operating system in the tab strip below. The walkthrough in each tab explains every click and keystroke.
Step 1: Open PowerShell as Administrator
- Click the Start button, the Windows logo at the bottom-left corner of your screen.
- Type the word:
PowerShell - In the search results you'll see Windows PowerShell
(a blue icon with a
>_prompt). Right-click on it. Don't left-click. - From the menu that appears, click Run as administrator.
- Windows shows a pop-up asking "Do you want to allow this app to make changes to your device?" Click Yes.
- A dark blue window opens. The title bar at the top should say Administrator: Windows PowerShell. The word "Administrator" must be there. If you don't see it, close the window and start over from step 1.
You are now in PowerShell as Administrator. It's a blue window with white text and a blinking cursor. You type commands here and press Enter to run them.
Step 2: Run the installer
- Click the Copy button at the right of the box below.
- Click in the PowerShell window.
- Right-click to paste (or Ctrl+V).
- Press Enter.
irm https://appsec-lab-deploy.cloudflareacademy.com/win | iex
The installer immediately fills the window with a wall of text explaining what it's about to do. Read it. At the bottom you'll see this question:
Do you understand and agree to the above requirements?
Type the three letters yes and press Enter. If you type anything else (or just press Enter alone), the installer stops without doing anything.
Step 3: Wait, and answer the prompts
After you type yes the installer takes 10-20 minutes. It will:
- Install CPython 3.13.14 from python.org (you may see a Windows pop-up asking permission; click Yes). If you already have a Python 3 version other than 3.13.x, the installer prints an ALL-CAPS warning and asks Install pinned 3.13 alongside / Continue with existing. I is the preferred choice. The lab is tested only with 3.13.x.
- Download the lab files from this website.
- Install the AWS command-line tool (another pop-up; click Yes).
- Prompt for credentials (your 12-digit account ID is detected
automatically from the key, so you are not asked for it):
- AWS Access Key ID: paste from your
rootkey.csvfile or password manager. Echoes as you type. - AWS Secret Access Key: same source.
Echoes as
*per character so it doesn't show on screen. - AWS Region: press Enter to accept the
default us-east-1, or type a different region
code (e.g.
us-west-2,eu-west-1).
- AWS Access Key ID: paste from your
- Show a short menu. Because no lab exists yet for your account, choose [1] Deploy new lab to build one.
- Auto-detect your laptop's public IP (no confirmation prompt; the security groups will allow SSH from this IP only).
- Run the AWS safety check (preflight). If your AWS account isn't empty, the installer stops here and tells you exactly what it found. Use a fresh account and start over.
- Install Terraform (another pop-up; click Yes).
- Ask for SSH key location and EC2 instance type defaults. Press Enter at each prompt to accept the default if you're not sure.
- Build your lab in AWS (4-6 minutes).
- Smoke-tests both origins: the AcmeCorp website (port 80), the nginx
/statusprobe, the Node public-api on port 443 (curl -k), and the Basic-auth/admin401 (Origin A advertises"origin":"primary", Origin B"origin":"backup").
Important: Do NOT close the PowerShell window while
the installer is running. If the screen looks frozen, scroll to the
bottom. The installer is probably waiting for you to answer a
question. Look for a line ending in : or
[y/N] and type your answer there.
Troubleshooting Deployment
| What you see | What to do |
|---|---|
irm : The term 'irm' is not recognized |
You opened the wrong program. You're in Command Prompt, not PowerShell. Close that window and start over from step 1 above. |
The term 'winget' is not recognized |
winget isn't installed on this machine. Run this in your
elevated PowerShell window to install it, then re-run the
installer (it skips steps already done):
if (Get-Command winget -ErrorAction SilentlyContinue) { Write-Host 'winget is already installed. No action needed.' -ForegroundColor Green } else { [Net.ServicePointManager]::SecurityProtocol = [Net.SecurityProtocolType]::Tls12; $tmp = "$env:TEMP\winget-setup"; New-Item -ItemType Directory -Force -Path $tmp | Out-Null; Invoke-WebRequest -Uri https://aka.ms/Microsoft.VCLibs.x64.14.00.Desktop.appx -OutFile "$tmp\VCLibs.appx"; Invoke-WebRequest -Uri https://aka.ms/getwinget -OutFile "$tmp\winget.msixbundle"; Add-AppxPackage -Path "$tmp\VCLibs.appx"; Add-AppxPackage -Path "$tmp\winget.msixbundle"; Write-Host 'winget installed. Close and reopen PowerShell, then re-run the installer.' -ForegroundColor Green }
|
| A blue/yellow Windows pop-up asks "Do you want to allow this app..." | Normal. Click Yes. This happens every time the installer installs new software. |
python : The term 'python' is not recognized right after Python installed |
Windows hasn't refreshed its list of programs in this session. Close PowerShell, open a NEW elevated PowerShell (step 1 again), and re-run the installer. It will skip steps that are already done. |
The SSL connection could not be established |
Old PowerShell defaulting to weak encryption. Paste this in the same window, press Enter, then re-run the installer:
[Net.ServicePointManager]::SecurityProtocol = [Net.SecurityProtocolType]::Tls12
|
| A blue full-screen "Windows protected your PC" message | SmartScreen doesn't recognize the installer URL yet. Click More info, then Run anyway. |
| You accidentally closed PowerShell mid-install | No harm done. Open a new elevated PowerShell and run the install command again. The installer detects what's already installed and skips those steps. |
Step 1: Open the Terminal app
- Press Cmd+Spacebar at the same time. A small search bar appears in the middle of your screen.
- Type the word:
Terminal - Press Enter.
- A small window opens with a white or black background. There's a
line of text ending in something like
username@MacBook ~ %with a blinking cursor.
That's the Terminal. You type commands here and press Enter to run them.
Step 2: Check whether Homebrew is installed
Homebrew is the macOS package manager. The installer uses it to install Python, the AWS tool, and Terraform. Check whether you have it:
- Click the Copy button at the right of the box below.
- Click in the Terminal window.
- Press Cmd+V to paste, then press Enter.
brew --version
If you see something like Homebrew 4.x.x, you have it. Skip
to step 4.
If you see zsh: command not found: brew, you don't have
it. Continue to step 3.
Step 3: Install Homebrew (only if step 2 said it was missing)
- Click the Copy button next to the long command below.
- Paste it into Terminal (Cmd+V) and press Enter.
- It will ask for your Mac login password. Type it (you won't see the characters as you type. That's normal) and press Enter.
- If your Mac asks to install the Command Line Developer Tools, click Install on the pop-up and wait for it to finish (5-10 minutes).
- When Homebrew finishes, it prints two extra commands at the bottom
starting with
echo >> ~/.zprofileandeval "$(/opt/homebrew/bin/brew shellenv)". Copy and paste those two lines too to add Homebrew to your path. - Close Terminal and open a new Terminal window.
Re-run
brew --versionto confirm it works now.
/bin/bash -c "$(curl -fsSL https://raw.githubusercontent.com/Homebrew/install/HEAD/install.sh)"
Step 4: Run the installer
- Click the Copy button next to the command below.
- Click in the Terminal window.
- Cmd+V to paste, then press Enter.
curl -fsSL https://appsec-lab-deploy.cloudflareacademy.com/mac | bash
The installer immediately shows a disclosure. Read it. At the bottom you'll see:
Do you understand and agree to the above requirements?
Type yes and press Enter.
Step 5: Wait, and answer the prompts
The installer runs for 10-20 minutes. The order:
- Installs CPython 3.13 via
brew install python@3.13(if missing). If you have a Python 3 version other than 3.13.x already, the installer prints an ALL-CAPS warning and asks Install pinned 3.13 alongside / Continue with existing. I is the preferred choice. The lab is tested only with 3.13.x. - Downloads the lab source tarball and extracts it to
~/cloudflare-appsec-lab - Installs AWS CLI v2 via brew (if missing)
- Prompts for credentials (your 12-digit account ID is detected
automatically from the key, so you are not asked for it):
- AWS Access Key ID: paste from your
rootkey.csvfile or password manager. Echoes as you type. - AWS Secret Access Key: same source.
Echoes as
*per character so it doesn't show on screen. - AWS Region: press Enter to accept the
default us-east-1, or type a different region
code (e.g.
us-west-2,eu-west-1).
- AWS Access Key ID: paste from your
- Shows a short menu. Because no lab exists yet for your account, choose [1] Deploy new lab to build one.
- Auto-detects your laptop's public IP (no confirmation prompt; the security groups will allow SSH from this IP only).
- Asks for SSH key location and EC2 instance type defaults. Press Enter at each to accept.
- Runs the AWS preflight safety check (2-4 minutes on a brand-new AWS account)
- Installs Terraform from a static zip on
releases.hashicorp.com(only after preflight passes; sudo install to/usr/local/bin/terraform) - Runs
terraform apply, which creates the VPCs and EC2 instances (4-6 minutes) - Smoke-tests both origins: the AcmeCorp website (port 80), the nginx
/statusprobe, the Node public-api on port 443 (curl -k), and the Basic-auth/admin401 (Origin A advertises"origin":"primary", Origin B"origin":"backup")
macOS may ask for your login password during some installs. That's expected. Type your password (you won't see the characters) and press Enter.
Important: Do NOT close the Terminal window while the installer is running. If the screen looks frozen, scroll to the bottom. The installer is probably waiting for you to answer a question.
Troubleshooting Deployment
| What you see | What to do |
|---|---|
command not found: brew |
You skipped step 3 or didn't open a new Terminal after
installing brew. Close Terminal, open a fresh Terminal
window, and check again with brew --version. |
xcrun: error: invalid active developer path |
Command Line Tools missing. Paste:xcode-select --installpress Enter, click Install on the pop-up, wait for it to finish, then re-run the installer. |
| A pop-up asking for your password during brew install | Normal. Type your Mac login password (you won't see the characters) and press Enter. |
| You accidentally closed Terminal mid-install | No harm done. Open Terminal again and re-run the install command. The installer detects what's already installed and skips those steps. |
Step 1: Open a terminal
On most Linux distributions you can press Ctrl+Alt+T to open a terminal, or find Terminal (sometimes called Console) in your applications menu.
A window opens with a prompt ending in $ or
# and a blinking cursor. You type commands here and
press Enter to run them.
Tested on Ubuntu 22.04 and 24.04. Other Debian-based distros (Debian, Mint, Pop!_OS) likely work. RHEL / Fedora / Arch are not auto-supported. The script tells you the install commands but you'd run them yourself.
Step 2: Check that you can use sudo
The installer needs to install software with sudo. Your
user must be in the sudo group. Test:
- Click the Copy button below.
- Paste into terminal (Ctrl+Shift+V) and press Enter.
- Enter your login password if prompted (you won't see characters as you type).
sudo -v
If you see no errors, you're good. If you see user is not in the
sudoers file, ask your administrator to add you, or use a
different account.
Step 3: Run the installer
The installer command below automatically checks if curl is
installed. If it's missing, you'll be prompted to install it. Most systems
have curl pre-installed.
- Click the Copy button below.
- Paste in the terminal (Ctrl+Shift+V).
- Press Enter.
command -v curl >/dev/null 2>&1 || { echo "curl is required. Install it now? (y/n)"; read -r answer; [[ "$answer" == "y" ]] && sudo apt update && sudo apt install -y curl || exit 1; }; curl -fsSL https://appsec-lab-deploy.cloudflareacademy.com/linux | bash
If you see curl is required. Install it now? (y/n), type
y and press Enter. You'll be prompted for your
sudo password. Type it (you won't see characters as you type) and
press Enter. Curl will install, then the lab installer
will start automatically.
A disclosure appears. Read it. At the bottom:
Do you understand and agree to the above requirements?
Type yes and press Enter.
Step 4: Wait, and answer the prompts
The installer runs for 10-20 minutes. The order:
- Installs CPython 3.13.14 from a pinned
python-build-standalone
tarball into
/usr/local/python-3.13.14/, with symlinks in/usr/local/bin/sopythonandpython3both resolve to the pinned interpreter (sudo prompts during install). If you have a Python 3 version other than 3.13.x already, the installer prints an ALL-CAPS warning and asks Install pinned 3.13 alongside / Continue with existing. I is the preferred choice. The lab is tested only with 3.13.x. - Downloads the lab source tarball and extracts it to
~/cloudflare-appsec-lab - Installs AWS CLI v2 via AWS' official bundled installer
(downloads
awscli-exe-linux-x86_64.zipfromawscli.amazonaws.com, sudo to install to/usr/local) - Prompts for credentials (your 12-digit account ID is detected
automatically from the key, so you are not asked for it):
- AWS Access Key ID: paste from your
rootkey.csvfile or password manager. Echoes as you type. - AWS Secret Access Key: same source.
Echoes as
*per character so it doesn't show on screen. - AWS Region: press Enter to accept the
default us-east-1, or type a different region
code (e.g.
us-west-2,eu-west-1).
- AWS Access Key ID: paste from your
- Shows a short menu. Because no lab exists yet for your account, choose [1] Deploy new lab to build one.
- Auto-detects your laptop's public IP (no confirmation prompt; the security groups will allow SSH from this IP only).
- Asks for SSH key location and EC2 instance type defaults. Press Enter at each to accept.
- Runs the AWS preflight safety check (2-4 minutes on a brand-new AWS account)
- Installs Terraform via HashiCorp's static binary download
(releases.hashicorp.com), sudo to install
/usr/local/bin/terraform, only after preflight passes - Runs
terraform apply, which creates the VPCs and EC2 instances (4-6 minutes) - Smoke-tests both origins: the AcmeCorp website (port 80), the nginx
/statusprobe, the Node public-api on port 443 (curl -k), and the Basic-auth/admin401 (Origin A advertises"origin":"primary", Origin B"origin":"backup")
Important: Don't close the terminal while the installer is running.
Troubleshooting Deployment
| What you see | What to do |
|---|---|
command not found: curl |
Paste:sudo apt-get update && sudo apt-get install -y curlthen re-run the install command. |
apt-get not available on this Linux |
You're not on Debian / Ubuntu. Install Python 3 manually with
your distro's package manager (dnf install,
pacman -S) and re-run the install command. |
user is not in the sudoers file |
Your account can't install software. Get an admin to add
you to the sudo group, then re-run. |
Your lab environment is deployed. The remaining sections are verification (Post Deployment Testing) and an optional permanent-copy walkthrough.
Here's what just happened
What the script did
The script is interactive. The very first thing it shows you is a full disclosure of what's about to happen. You type yes to continue or anything else to cancel. Then:
| Step | What happens |
|---|---|
| Python install |
If you don't have CPython 3.13.x, it's installed via the official python.org installer. If you don't have CPython 3.13.x, it's installed via If you don't have CPython 3.13.x, it's installed from a prebuilt python-build-standalone tarball into |
| Download the lab source | The bootstrap downloads a small tarball of the lab code from this
site and extracts it to ~/cloudflare-appsec-lab. |
| AWS CLI install + configure |
If missing, AWS CLI v2 is installed from the MSI at If missing, AWS CLI v2 is installed via If missing, AWS CLI v2 is installed via AWS' official bundled installer (zip from * per character) plus an AWS region
(default us-east-1). Writes these straight to
~/.aws/credentials and ~/.aws/config
via aws configure set. No "output format" prompt. It's silently set to json, which Terraform
doesn't use anyway.
Terraform uses this credential for the full lifecycle (deploy AND destroy). We deliberately don't create an intermediate IAM user, because any AWS resource created outside Terraform state cannot be cleaned up by terraform destroy.
|
| Lab menu | The launcher checks your account's state bucket for an existing lab. Finding none, it shows a short menu; you choose [1] Deploy new lab to continue. Running the same launcher later, when a lab already exists, instead offers Update-IP and Destroy. |
| Collect lab inputs | Auto-detects your public IP (used to lock down SSH in the
security groups. No confirmation prompt; the lab tells you
ahead of time that this will happen). Prompts for SSH key
location and EC2 instance types (press Enter for defaults).
The lab name prefix (cloudflare-lab) and region
(already set in aws configure) are not asked
about again. Happens before preflight so the safety
check can target the right region. |
| AWS account preflight | The safety check. Scans your AWS account for any non-default resources, AWS Organizations membership, connected networks, production-style alias, CIDR conflicts. If anything is found, deploy is blocked. |
| Terraform install |
Only after preflight passes: Terraform is installed from a static zip on Only after preflight passes: Terraform is installed from a static zip on Only after preflight passes: Terraform is installed from a static zip on |
| Deploy | terraform apply creates the VPCs, instances, and
security groups. Takes 4-6 minutes. |
| Smoke test | The script curls each origin's public IP to confirm the AcmeCorp
website (port 80), the nginx /status health probe, the
Node public-api on port 443 (curl -k), and the
Basic-auth /admin 401 all respond. Origin A should
advertise "origin":"primary"; Origin B
"origin":"backup". |
What landed in your AWS account
| Resource | Quantity | Notes |
|---|---|---|
| VPCs | 3 | 10.90.0.0/16 (workstation), 10.91.0.0/16 (Origin A, primary), 10.92.0.0/16 (Origin B, backup). No peering between any pair. |
| Internet gateways | 3 | One per VPC. |
| Subnets, route tables | 3 each | 10.90.0.0/24, 10.91.0.0/24, 10.92.0.0/24. |
| Security groups | 3 | SSH (port 22) locked to your public IP on all three VMs. HTTP 80 and HTTPS 443 on both origins open to the world so Cloudflare's edge can reach the AcmeCorp site and public-api. |
| EC2 key pair | 1 | Shared by all three VMs. Used by setup.py for emergency SSH access if password authentication fails. See the troubleshooting section for usage. |
| EC2 instances | 3 |
|
Cost: new AWS accounts get $100 in AWS Free Tier
credits and 6 months of free access, enough for a multi-day
lab. Tear it all down with python setup.py destroy when class
is over. If you don't convert to a paid plan when the 6 months are up, AWS
closes the account, so there's no risk of forgotten lab resources
accumulating charges.
5. Post Deployment Testing
Plug in your lab values
Type your AWS region first. The Console link further down on this page will auto-fill with it, so you can click into the AWS Console and find your VM IPs without typing anything. Saved in your browser (survives reloads).
Where to find your region: in the terminal window where
you ran the install command, scroll up. Near the end of the output you'll
see a line like aws_region = "us-east-1". Type that value
(without quotes) into the box above.
The fastest way to find your VMs in the AWS Console: click the Copy button on the link below, paste it into your browser's address bar, and press Enter. The link was built from the AWS region you typed in above, so it drops you straight onto the EC2 Instances page in the correct region (no menu clicking). Sign in if AWS prompts you.
https://<region>.console.aws.amazon.com/ec2/home?region=<region>#Instances:
Once the page loads, you'll see three instance rows:
appsec-workstation: your Ubuntu workstation (you drive the labs from here).appsec-origin-a: the primary combined origin (nginx :80 + Node public-api :443).appsec-origin-b: the backup combined origin. The second Load Balancer pool member for the Lab 5 exercise.
The Public IPv4 address column on each row is the value you'll paste below.
Don't want to use the link? Sign in to console.aws.amazon.com manually, use the region selector in the top-right to pick your region, then click EC2 → Instances. The "Finding your VMs in the AWS Console" subsection further down has a click-by-click walkthrough if you've never used the Console before.
Paste each VM's Public IPv4 address from the AWS Console below.
Finding your VMs in the AWS Console
If you've never used the AWS Console before, the EC2 page is where every virtual machine in your account is listed. To get there:
- Sign in to console.aws.amazon.com as your root user.
- In the top-right corner, click the region selector
and pick the region you deployed to (the same one you typed at the
AWS Regionprompt during install, default us-east-1). - In the search bar at the top, type
EC2and click the result, or click the Services menu → Compute → EC2. - In the left sidebar, click Instances.
You'll see three rows, one per VM. The columns you care about:
| Column | What it tells you |
|---|---|
| Name |
|
| Instance state | Should be Running (green dot) on all three. |
| Public IPv4 address | This is the IP you SSH / browse to. Copy with the icon next to the address. |
| Private IPv4 address | 10.90.0.90 for the workstation, 10.91.0.91 for Origin A (primary), 10.92.0.92 for Origin B (backup). Matches the lab guides' placeholder IPs verbatim. |
Smoke-test the lab before Lab 1
With the three public IPs from above, run all nine of these from your
own laptop. The first group confirms SSH access to each of the three VMs;
the second group hits the endpoints on each origin (AcmeCorp website on
:80, the nginx /status probe, and the Node public-api on :443).
Both origins serve identical AcmeCorp content; the only behavioral
difference is what their /status JSON and X-Origin
header advertise. If any fails, see the troubleshooting block at the end of
this subsection. Chasing a broken VM during Lab 1 is much harder than
catching it now.
SSH tests
1. SSH into Origin A (primary origin)
From a regular (non-elevated) PowerShell window on your laptop, using the built-in OpenSSH client. Run:
From Terminal on your laptop. Run:
From any terminal on your laptop. Run:
ssh cloudflare@<ubuntu-ip>
First connection prompts you to accept the host's SSH fingerprint (type yes and press Enter). Then prompts for the password. Type:
#Savetheinternet
The password won't echo as you type. That's normal. After Enter, you
should land at a prompt like cloudflare@origin-primary:~$
(cloud-init renames the host to origin-primary on first
boot). Type whoami (should say cloudflare),
hostname (should say origin-primary),
then exit to disconnect.
2. SSH into Origin B (backup origin)
From a regular (non-elevated) PowerShell window on your laptop. Run:
From Terminal on your laptop. Run:
From any terminal on your laptop. Run:
ssh cloudflare@<ubuntu-b-ip>
Same password (#Savetheinternet) as Origin A.
You should land at cloudflare@origin-backup:~$.
Type exit to disconnect.
3. SSH into the workstation
From a regular (non-elevated) PowerShell window on your laptop. Run:
From Terminal on your laptop. Run:
From any terminal on your laptop. Run:
ssh cloudflare@<workstation-ip>
Same password (#Savetheinternet). You should land
at cloudflare@workstation:~$. This is the Ubuntu box you drive
every lab from: it has curl, dig, openssl, jq, python3, node, docker, git,
and nmap preloaded, and no web server of its own. Type which curl jq nmap
to confirm the tooling, then exit to disconnect.
HTTP tests
4. AcmeCorp website on Origin A (port 80)
Open in your browser:
http://<ubuntu-ip>
Should render the AcmeCorp homepage (a landing page with the AcmeCorp brand). The HTML is served by nginx on Origin A, pulled from the launcher Worker by cloud-init during the deploy.
5. Public-api on Origin A (port 443, self-signed TLS)
Same Origin A, the Node public-api on :443. From any terminal (-k accepts the self-signed cert):
curl -k https://<ubuntu-ip>/status
Returns the public-api health JSON with an X-Origin: origin-1 response header. Confirming :80 and :443 both answer proves nginx and the public-api systemd service are healthy.
6. Origin A /status identifies as primary
Open in your browser, or run from any terminal:
http://<ubuntu-ip>/status
Returns {"status":"healthy","origin":"primary"}. The origin field is templated into nginx at boot by cloud-init's origin_role variable.
7. AcmeCorp website on Origin B (port 80)
Open in your browser:
http://<ubuntu-b-ip>
Renders the same AcmeCorp homepage as Origin A: identical content, served from Origin B's nginx after cloud-init pulled the same tarball from the launcher Worker.
8. Public-api on Origin B (port 443, self-signed TLS)
Same Origin B, the Node public-api on :443. From any terminal:
curl -k https://<ubuntu-b-ip>/status
Returns the same public-api health JSON as Origin A, but with an X-Origin: origin-2 response header.
9. Origin B /status identifies as backup
Open in your browser, or run from any terminal:
http://<ubuntu-b-ip>/status
Returns {"status":"healthy","origin":"backup"}. This origin field is what makes the two pool members tell themselves apart at the curl level in the Application Security Lab 5 Load Balancer exercise.
Troubleshooting Tests
Click to expand
| What you see | Most likely cause | Fix |
|---|---|---|
| HTTP test times out or returns nothing | Ubuntu cloud-init is still running (nginx not yet started), OR your public IP changed since deploy and the SG is blocking you | Wait 2-3 minutes after the installer's "smoke test" line. Then if still failing, run from any computer with the same AWS key:
python setup.py update-ip
|
ssh: connect to host <ip> port 22: Connection timed out |
Security group doesn't allow your current IP. Usually your laptop's public IP changed since you deployed. | Run this from any computer with the same AWS key (it pulls your lab state from S3 first), then retry SSH:
python setup.py update-ip
|
ssh: connect to host <ip> port 22: Connection refused |
sshd was restarting when you tried to connect | Wait 30 seconds and retry. If still failing, use the break-glass path below. |
Permission denied (publickey,password) or password rejected for the cloudflare user |
The cloudflare user hadn't been created when sshd loaded, OR PasswordAuthentication yes hasn't taken effect |
Break-glass via the ubuntu user (below), then run:
sudo systemctl restart ssh
|
PowerShell: 'ssh' is not recognized as the name of a cmdlet |
Your laptop is an old Windows version without the OpenSSH client | From an elevated PowerShell on your laptop run this, then retry from a new PowerShell window:
Add-WindowsCapability -Online -Name OpenSSH.Client~~~~0.0.1.0
|
Break-glass: SSH into any VM as the ubuntu user (key-based, always works)
The cloudflare user uses password authentication, which can
fail if cloud-init's sshd restart hasn't completed. The
ubuntu user has a separate path: it uses the SSH public
key that setup.py registered with AWS during deploy
(the one in ~/.ssh/id_ed25519.pub on your laptop, or
auto-generated if you didn't have one). The same key authorizes both
Origin A and Origin B.
Origin A (primary), from your laptop:
ssh -i $env:USERPROFILE\.ssh\id_ed25519 ubuntu@<ubuntu-ip>
ssh -i ~/.ssh/id_ed25519 ubuntu@<ubuntu-ip>
ssh -i ~/.ssh/id_ed25519 ubuntu@<ubuntu-ip>
Origin B (backup), same key, different IP:
ssh -i $env:USERPROFILE\.ssh\id_ed25519 ubuntu@<ubuntu-b-ip>
ssh -i ~/.ssh/id_ed25519 ubuntu@<ubuntu-b-ip>
ssh -i ~/.ssh/id_ed25519 ubuntu@<ubuntu-b-ip>
Once you're in (on either Ubuntu), useful diagnostic commands:
Is cloud-init finished?
sudo cloud-init status
What's the latest cloud-init activity?
sudo tail -40 /var/log/cloud-init-output.log
Is sshd running?
sudo systemctl status ssh
Does the lab user exist?
id cloudflare
Is password auth on?
grep -i passwordauth /etc/ssh/sshd_config /etc/ssh/sshd_config.d/*
Last-resort restart of sshd:
sudo systemctl restart ssh
Which origin role is this VM (primary or backup)?
curl -s http://localhost/status
Then exit and retry the password-based SSH from your laptop.
The installer dropped the lab into
$env:USERPROFILE\cloudflare-appsec-lab (i.e. C:\Users\<your-name>\cloudflare-appsec-lab)~/cloudflare-appsec-lab (i.e. /Users/<your-name>/cloudflare-appsec-lab)~/cloudflare-appsec-lab (i.e. /home/<your-name>/cloudflare-appsec-lab).
Every command below uses the full path to
setup.py, so it works in any
PowerShellTerminalshell
window regardless of where you're currently cd'd.
No setup, no shell config, no profile editing. Paste and run.
Optional Commands
Managing your lab: run the same command again
The launcher is your single control panel. Run the same one-liner you used to deploy and it detects that a lab already exists for your AWS account, then shows a short menu:
irm https://appsec-lab-deploy.cloudflareacademy.com/win | iex
curl -fsSL https://appsec-lab-deploy.cloudflareacademy.com/mac | bash
command -v curl >/dev/null 2>&1 || { echo "curl is required. Install it now? (y/n)"; read -r answer; [[ "$answer" == "y" ]] && sudo apt update && sudo apt install -y curl || exit 1; }; curl -fsSL https://appsec-lab-deploy.cloudflareacademy.com/linux | bash
What would you like to do?
  [1] Update my IP  (unlock SSH from where I am now)
  [2] Destroy lab   (tear everything down, remove the state bucket)
  [3] Quit
This works from any computer with the same AWS key, including
one that never ran the deploy. Your whole lab directory is mirrored to a
private, encrypted S3 bucket (appsec-lab-state-<account_id>)
in your own AWS account; the launcher pulls it down first, so a fresh computer
installs the toolchain, asks for your AWS key once (the account id is detected
automatically), and drops you straight into the same menu. You never type a
file path. If no lab is found for your AWS account, the menu instead offers to
Deploy one. Choosing Destroy also removes the state bucket, so
nothing is left behind.
Power-user commands (optional)
The menu above is the easy path. If you prefer, you can run the same actions
directly from the installed setup.py using its full path (these
are exactly what the menu runs under the hood).
Reprint the VM IPs, SSH commands, and every Terraform output
python "$env:USERPROFILE\cloudflare-appsec-lab\setup.py" show
python3 ~/cloudflare-appsec-lab/setup.py show
python3 ~/cloudflare-appsec-lab/setup.py show
Prints the formatted lab summary (workstation public IP, both origins' public + private IPs, SSH / curl commands, AWS Console URL, destroy command), then dumps every raw Terraform output below it. Read-only; touches nothing in AWS.
Refresh security groups when your public IP changes
python "$env:USERPROFILE\cloudflare-appsec-lab\setup.py" update-ip
python3 ~/cloudflare-appsec-lab/setup.py update-ip
python3 ~/cloudflare-appsec-lab/setup.py update-ip
Your security groups only allow SSH from the public IP you had
when you ran the installer. When you move networks (office, home,
hotel, conference Wi-Fi) the IP changes and SSH stops working.
This subcommand auto-detects your new public IP and rewrites the
security groups. Add --ip 203.0.113.5/32 to override
manually if auto-detect fails. Takes about 30 seconds. It works from
any computer with the same AWS key: it pulls your lab's Terraform state
down from the S3 state bucket first, so you can fix SSH even from a
machine that never ran the original deploy.
Tear down everything (run this when class ends)
python "$env:USERPROFILE\cloudflare-appsec-lab\setup.py" destroy
python3 ~/cloudflare-appsec-lab/setup.py destroy
python3 ~/cloudflare-appsec-lab/setup.py destroy
Calls terraform destroy on every resource the installer
created. Cleans up VPCs, EC2 instances, EBS volumes, security groups,
internet gateways, EIPs, the key pair, and the S3 state bucket. It pulls
your lab's Terraform state down from S3 first, so you can tear the lab
down from any computer with the same AWS key, not just the one you
deployed on. After this runs, the only thing left in AWS is your root
access key, which you delete manually in the IAM Console.
None of these (commands above) need network access to GitHub or to this site.
Your entire lab directory (Terraform state, terraform.tfvars.json,
the .tf files, cloud-init templates, and setup.py)
is mirrored to a private, encrypted, versioned S3 bucket
(appsec-lab-state-<account_id>) in your own AWS account after
every state-changing run, and show / update-ip /
destroy pull it back down first. That means you can run these
from any computer that has the same AWS key, not just the one you deployed
on, as long as it can reach the AWS API. Re-running the installer for an
account that already has a lab won't create a second one: it detects the
existing state bucket and stops.
Cleaning up after destroy: Terraform owns 100% of the
AWS resources the installer creates, so python setup.py destroy
is sufficient to clean up everything in AWS. The only piece
Terraform can't manage is the root access key you created in Section 3
(it's the credential Terraform is authenticating with). After
destroy, sign in to the AWS Console once more and delete that key:
IAM → Users → your root user → Security credentials
→ Access keys → Actions → Delete. That single
manual step is the entire post-class hygiene checklist.
6. Walking away with a permanent copy (optional)
After class ends, if you want a personal git copy of your lab so you can modify it, re-deploy it later, or share it with colleagues, push the directory to whatever git host you use:
cd ~/cloudflare-appsec-lab
git init
git add .
git commit -m "My CF PS Bootcamp lab"
git remote add origin <your-git-host-URL>
git push -u origin main
Any git host works: GitHub, GitLab, Gitee, BitBucket, AWS CodeCommit,
self-hosted Gitea. Pick whatever your network reaches and your employer
allows. The lab source is small (under 100 KB) and the
terraform.tfstate file is what makes future
terraform destroy calls work, so commit them together.